May 13, 2011

Springtime in Paris

I had fun helping my best friends daughter figure out a springtime layout. This picture doesn't do it justice.
Supplies Used:
Stamp sets
Easter Blossoms
Notably Ornate
Artistic Etchings
Cardstock
12x12 Marina Mist
Very Vanilla
Baja Breeze
Regal Rose
Certain Celery
Pink Piroquette
Early Espresso
Designer Series Paper Stack Subtles
Punches and Diecuts
Little Leaves Sizzlits
Scallop Square Bigz clear DIES
Scallop Circle #2 Bigz DIES
Scallop Oval Nestabilities
Itty Bitty Shapes Trio punch flower
Scallop Square Punch
Extras
Ink:Chocolate Chip, linen thread, hand held punch, Cricut and 3/4 letters cut
Thanks for stopping by, have a great day!
Brenda Anderson

May 11, 2011

Schools Inn

My personal challenge has been to scrapbook for 30 days, well I failed! This was the 5th time I have done it this month! Well at least I'm getting better at trying.
Of course as the Stampin Up year is coming to an end and next month we release the retired list I fall in love with the Celebrations designer paper. What the heck, its only been at my disposal for 10 months and just now I am using it. grrrrr. Well anyways this page is for my grandson, Tyson.
Supplies are:
12 x 12 Pacific Point
Celebrations Designer paper
Pear Pizzazz Paper(1/2,3/4,1 inch punches for book worm.) Layers of eyes are using the owl punch. The books are using the window punch making them smaller to stack. The apples I took a short cut using the Cr---t. I used the corner punch to round of the edges of the chalk board. I plan to use a White gel pen to write his name and year. I hope you liked this and thanks as always for stopping by.
Brenda

Wish Big!

This was really fun and alot of cutting using the Big Shot!
Fun birthday card for any age. Supplies used were:
Base card Pacific Point 11 x 4.25
1st layer Celebrations Designer paper blue dot 3.75 x 3
number print 3.75 x 2.50. Over lap when taping down. Run Real Red 1/4 grosgrain ribbon across the overlapped paper and tape ribbon to back.
Items to BIGSHOT
Large Scallop Circle #2 die in Real Red
3 inch circle in Pear Pizzazz using circle cutter
Bold Cup Cake Die use designer paper for bottom, whisper white with dazzling diamonds, candles are pacific point, flames are daffodil. Red glitter paper and small star punch. Scallop Circle Punch and red glitter paper. 1 3/8 circle punch with whisper white and Wish Big in Real Red.
Whew! That was a mouth full. I hope you enjoyed today's post. Have a great day!
Brenda

May 10, 2011

Follow your dreams

This gift set can be used for a fathers day or a graduation gift. The reason the card is so SHINY is because I like to use the card as a center piece for the bag. I use the largest of the Cello Bags and trim it down to 5.25. I insert the card and using the red tacky tape I fold it over loosely, peel and stick. I also use 2 strips down each side in the back before centering it on the bag. I stamped the tissue and bag to match and made a quick tag to tie together.This was super easy. I hope you enjoy this one. Supplies used were:
Tissue and Bag from Michaels.
Stamp Set: Open Seas/Word Play
Ink: Basic Grey, Not quite Navy, Cherry cobbler
Cardstock: Base card 8.5 x 5.5 Not Quite Navy
Designer Paper 5.25 x 5.25 Nautical Expedition
Cherry Cobbler 2 x 4.25/DP 1.75 x 4.25 matching square 2 x 2 for top corner.
Basic Grey 3.25 x 2.75 Cherry Cobbler 3 x 2.50 Whisper White 2.75 x 2.25
Tag: Basic Grey 4.25 x 2.50 Cherry Cobbler 1x2.50 Designer Paper .75 x 2.50 Cherry cobbler round tab punch. Whisper White punched out of Designer label punch. Bakers twine, and Jumbo Eyelet.
Thanks for stopping Brenda

May 9, 2011

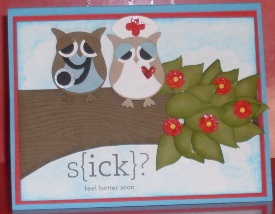
Get Well

I bought this tutorial from Kylie B. It was worth the work. Very Putsy but so fun, I had a great time doing this.
Base card: Tempting Turquoise
Layer 1 Real Red
Layer 2 Whisper White Clouds done in Tempting Turquoise.
Tree was out of Soft Suede with Espresso Ink wood grain stamp
Leaves are out of old olive using the leaf on the bird punch.
Flowers were real red with daffodil centers/ Mini trio punch. Nurses hat is the center of the owl turned upside down. Thanks for peeking.
Brenda

May 7, 2011

For Dad


I know this is Mothers Day weekend, but I stay ahead of myself, sometimes. This is one of those times! I love the new Open Seas stamp set we have in the new Summer Mini. Its been a long time since we've sailed the seas in a catalog. So I used the following:
Base Card Not Quite Navy
1st layer 4 x 5.25 Cherry Cobbler
2nd layer 3.75 x 5 Very Vanilla- torn down and sponged
Ink: Early Espresso, Not Quite Navy
Designer Paper:Nautical Expedition 1 x 3
Greeting Strip Very Vanilla 3/4 x 3
1 3/4, and 2 1/2 Circle Punch
Circle cutter 2" since we didn't have a 2" punch
I distressed everything in Early Espresso. Thanks for stopping
Brenda